Why is the Multiplier not picking up all the detail from my 3D printed tool?
The better air flows through a thermoforming tool, the higher the final part quality. By adding air holes to a tool, you can create parts or molds with higher degrees of detail and prevent air bubbles.
By adding air holes, the air gets sucked into the cavity. Without the air holes, there will be nowhere for the air to escape which will result in poorly formed mold. Make sure the holes are small enough so they don’t affect the mold, tiny 0.5mm air holes or as small as you can.
You can read more about how to design tooling for optimal forming quality here.
How to check if your air holes are clear
- Use an airgun to blow air through the air holes.
- Holes in resin can fill if not cleaned properly before curing.
Working with tall tools
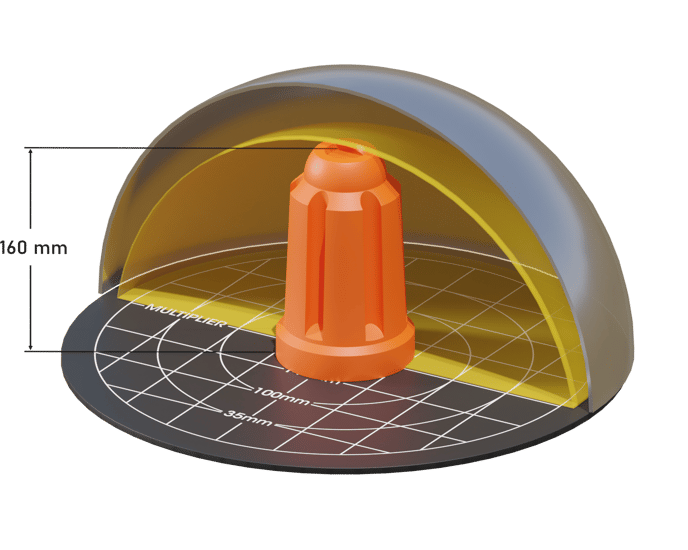
Because the Mayku Multiplier has a dome-shaped chamber, you’ll need to take the height and dimensions of your tool into consideration, especially if you are forming a large tool, or multiple tools. The maximum forming volume is 3.5 liters. The widest safe forming area is 380mm wide, and 160mm high. It's important to factor this in when designing your tool for thermoforming.
Tall and narrow templates, up to 160mm, can be placed in the centre of the forming bed:

For wider templates, such as in this example, the maximum height allowed is 60mm:
If you wish to utilize the entire forming bed, the template (or templates) must be shallower, as demonstrated in this example:
It’s best to work with tools made from a material with a melting point greater than that of your sheet material, ideally greater than 250°C.
If your tool melted in the Multiplier, we suggest reprinting the shape with thicker walls or, if the tool is not for an end part and you are in the early stages of prototyping, you can improve the 3D printed structure by filling the printed tool with plaster to give it extra strength.
What type of material can I use to fill in gaps in a 3D printed tool before forming?
Wood filler as it's easy to sand and sticks to the surface of the 3D printed part/tool. Plaster doesn't stick to 3D printed plastic and the plaster layer may get stuck to the mold once the shape is formed
Longevity of the tool
To increase longevity of the tool;
- Let the piece cool down slowly between forms.
- Add fillets and large draft angles, pressure is exerted on sharp corners and results in chipping over longer periods of time (this also helps with de-molding).
